This past January was the birthday of one of my girlfriends, Marta, from Connecticut, (If you are not one of my friends, quick crash course in Krogdahl moving history: Jamie and I lived in Sydney for 2 years, CT for 3, Shanghai - Yes, the China Shanghai- for 15 months - could not handle more :-) - , then back to Australia, Melbourne this time for 3.5 years and now back to the States for the time being. Yes, we have moved more than the gypsies with the caravans and the road has taken us to many wonderful places and we have made great friends everywhere). We have been very blessed indeed.
Anyway, back to my friend in CT. I had no idea what to get her for her birthday and one day when I was browsing the Stampin' Up Catalogue came past these wonderful perennial birthday calendars. And I thought, what a GREAT idea. I think this is a great idea as a present as it is something more personal.
The calendar comes completely blank, and I decorated each and every page with a different theme matching the months of the year - well hers was matching the us calendar, july with 4th of july, november with thanksgiving and January with snowflakes.
So, less talk more pictures, here is the completed result.
FRONT of the calendar, that was of course nicely wrapped and more ribbon attached :-)
For February I used a Stampin up Sale-a-Bration set called Sprinkled expressions. And I embossed the heart in red. It is from a retired Stampin Up stamp set called Always. You will see this one featured again and again, there is also a fabulous bird that I really love. Which is actually on the next page :-)
For march I used The Always set again for the bird this time, and Precious Butterflies.
For April I seed the tree, bird and sentiment from Best of Everything set, and added the flowers from Itty Bitty Bits.
Not sure if you can tell, but the little flowers on the trees have been stamped individually and punched and then attached with 3D foam for the pop up effect :-)
Not sure if you can tell, but the little flowers on the trees have been stamped individually and punched and then attached with 3D foam for the pop up effect :-)
May has a lovely butterfly theme that uses a wheel
For June I used a new stamp set called Mixed Bunch and the Printed Petals one
For July I used the star stamp from the Sprinkled Expressions set (same one I used for february with the heart) and Also heat embossed the white star. Not so visible in the picture.
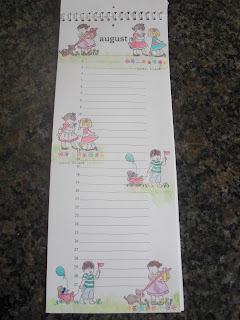
This set is called Little Friends and it's one of those that I saw and I HAD TO HAVE, I thought the kids were just adorable. And the little puppy and red wagon are too cute to resist. Was not sure what to use for the summer, as I did not have a summery beachy stamp set, but then thought the kids were just perfect.
September saw a wood-themed page, with the stamp sets Fox and friends and Funky Four. Also could not help it, I had to add the owl, with the owl builder punch. Isn't she adorable??? The googly eyes are just irresistible!
October is a good month for leaves and fruit, but also added the lovely pink flower for some contrast. This set is called Faith in Nature and you can get it a FREE from Stampin up with an order.
November is Thanksgiving month, so autumn coloured wreathes, some pumpkin pies, a thank you 3D add on and some lovely Designer Series Paper was all I needed for this page.
For December I used probably one of my favourite sets called Snow Swirled (some of you would have seen it previously on the Christmas cards I sent out). I love the Christmas tree in this set, the snowflakes are also adorable, but what I really like is that is has a Christian sentiment to go with it. And there aren't many that do ( I do own all the ones with a Christian sentiment, because I believe that is the reason we celebrate Christmas. We celebrate Christmas because Christ came on this Earth to redeem us, to save us from sin and give us the opportunity to have eternal life. I don't like the whole Happy Holidays or Season's Greetings business that takes Christ out of Christmas....It is called CHRISTmas for a reason)
I had to heat emboss all the elements on this page and it turned out stunning!!! Please excuse the wonky sentiment at the bottom, it was past midnight :-)
If you want one of these, I can either make them for you (just email me at downunderserendipity@gmail.com), the cost is $35 (which includes the cost of the calendar and all materials used). It can look the same or it can be customized with whatever themes you choose. For those back in Australia January would obviously NOT be snowflakes :-)))
Alternatively I also do classes and you can make your own calendar, cost is $15 per class (usually 2 hrs) plus the cost of the calendar.
Hope you enjoyed today's post, now I have to go I have a few girlfriends coming over for a project and I need not only to snip and cut, but also to come up with a design :-))
Hugs,
Renate


